Guideline for Brewing with Moka Pot (dated 2022 Feb)
Note
- This is a general guideline for brewing with Moka Pot, based on my personal experience and information i got it from YouTube, mainly James Hoffman.
- This post serve as a update for my previous post "Tips for using Moka Pot (dated 2021 Jan)"
Grinder
- Get a good one, this is the one you have to chunk money in if you want a good cup.
- For hand grinder, get from a good brand like Timemore, BPlus, Kinu, 1Zpresso, and C40. The price should be about RM900 to RM1400.
- Currently i am using Apollo Manual Hand grinder from BPlus, Taiwan. (Click here for product link)
- If you want to go for automatic grinder, the minimal i would recommend is Baratza Sette 270.
- If you have more budget, then you can consider DF64, Eureka Mignon Single Dose, Niche Zero, Lagom P64 if you are really, really flushed with cash.
Flat Burr and Conical Burr (more of hearsay)
- This is what i learn from coffee enthusiast, may not be true, but not really important, just for you to know. You can skip if you are not interested.
- Flat Burr - give a rounder, rounded edge coffee particle.
- May bring out more of the chocolaty and nutty flavor, commonly profound in beans from South and Central America.
- Example machine: Eureka Mignon, DF64
- Conical Burr - give a more square, more jagged sharp edged coffee particle.
- May bring out more of the individual bright flavor, such as beans from Africa.
- All hand grinder uses conical burr.
- Example machine: Niche Zero, Apollo Hand Grinder, Kinu M47, etc.
Grind Size
- Finer than filter
- Coarser than espresso.
- The finetune in between, you would have to tune it yourself.
- Rules of thumbs are:
- Finer for lighter roast
- Finer for harder bean, meaning those grew in high altitude, above 1800m.
- Coarser for darker roast.
- Coarser for softer bean, like Columbia Suprimo, Brazilian Santos.
Water Temperature
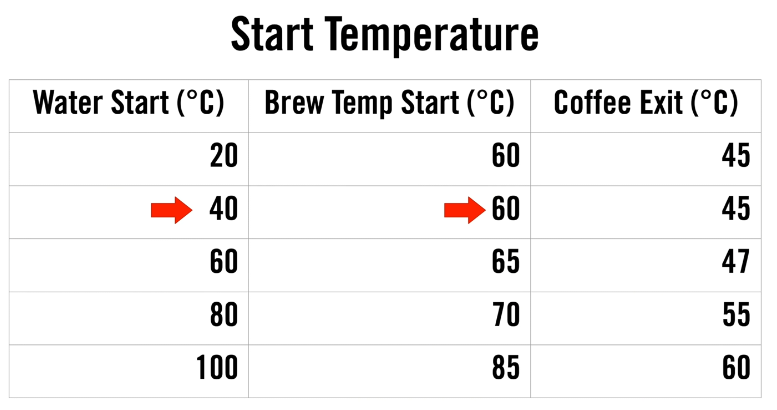 |
- You can start with cold water, but it would take longer to brew. It wont change the flavor if you kept it at low-medium heat the entire time.
- Boil in kettle.
- Measure the target volume in gram(s). More of the target volume later below.
- Pour into the cold moka pot boiling chamber.
- Will explain the heat adjustment later.
Coffee-Water Ratio
The ratio of coffee is always one, so i will omit it and just showed you the water volume per 1 gram of coffee powder.
Light Roast
- 6.5g to 7.5g of water
Medium Roast
- 5.5g to 6.5g of water
Dark Roast
- 4.5g to 5.5g of water
Note that the range above are pure coffee powder to water ratio, but since this is a moka pot, you will have to take into consideration the water retention in moka pot.
So here, i will give you an example using 1:7 extraction ratio.
- coffee powder = 20g
- water in the boiler = 200g to 220g
- on average, i found that about 60g to 80g if the water will remain in the boiler at the end of the brew, those water are the leftover and super hot, not good for coffee.
So, the formula is:
Coffee_Powder * Extraction_Ratio + 70g_water
- I use 70g as the value of water retention in the moka pot, you can put yours in if you want.
Use this as an example to adjust your water.
Prepping the Funnel
- Grind the bean.
- Pour into the moka funnel.
- Use an espresso de-clumper to break off any clumps.
- Tap gently on the side and bottom of the funnel to let the coffee settle in.
- Use a straight tool, e.g., ruler, and run around the funnel top, to remove excess coffee. This is to make sure that your coffee surface is flat.
- There is no need to bloom the coffee in the funnel, because it elongates the preparation time, can get messy if not cautious, and does not improve the taste.
 |
| Image source here. |
Additional Steps
- Wet a piece of Aeropress filter paper, and stick it to the bottom of brew chamber.
- Just like the image below.
- I done this, this will
- increase the resistance,
- sweeter,
- make a much, much cleaner cup
- and a surprising amount of foam. So, i highly recommend that you buy one and use it, since you can use it repeatedly.
- Do remember,
- only 1 piece, and only the one from Aeropress,
- and not use the thicker ones, e.g., from Aesir.
 |
| Image courtesy from James Hoffman YouTube Video, source. |
Cooking the pot
- Use low to medium heat, preferably LOW.
- Use a heat diffuser plate, and remember to get a thick, steel, or stainless steel one.
- Because the heat diffuser will act as a heat capacitor when you off the heat later.
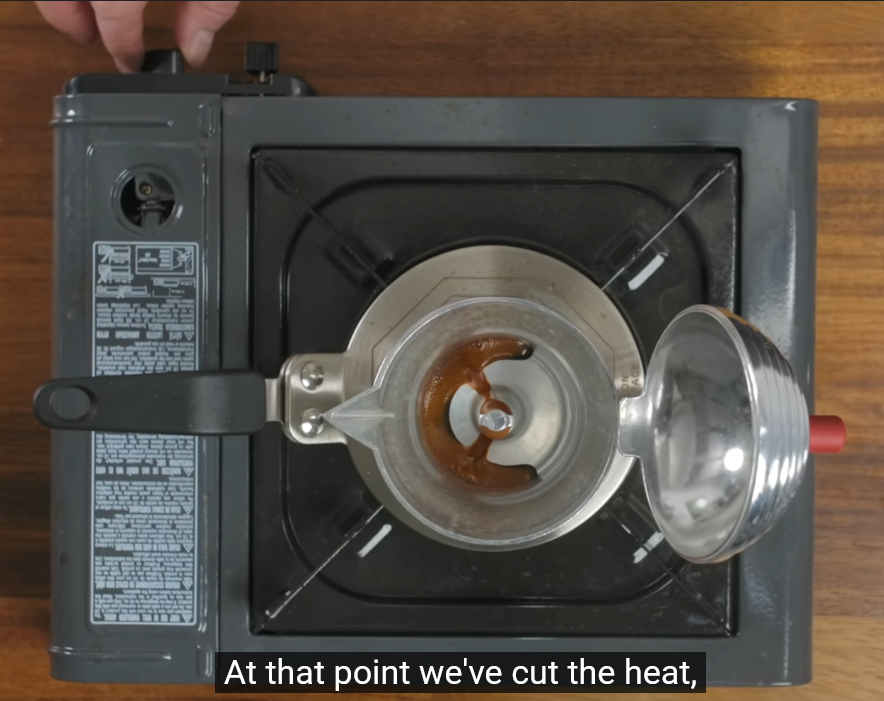
When to off the heat?
You dont want kept the heat on for the entire brew, to avoid overextraction of the coffee, which is very easy for moka pot.
- When the coffee starts to flow to the collection chamber (see picture below), cut the heat.
- You can wait a bit longer if the flow is very slow, but once the flow of the coffee is smooth, cut it heat immediately.
- Let the heat diffuser continuously supply the heat to the boiler, but in a gentle manner.
- Using this, you will notice that the sputtering is less "angry" and that is a sign of good extraction.
 |
Dilution
- Whatever the concentration you preferred.
- But if you have no idea, then start with 1:1 dilution for your moka pot.
- Meaning, if you extracted out 120g of coffee, just add
- another 120g of hot water,
- or 120g of ice if you want to have a ice coffee.
- As for milk, generally i would recommend
- 120g of warm milk if you want a latte feel.
- 60g (half) if you want something close to Cappuccino.

Comments
Post a Comment